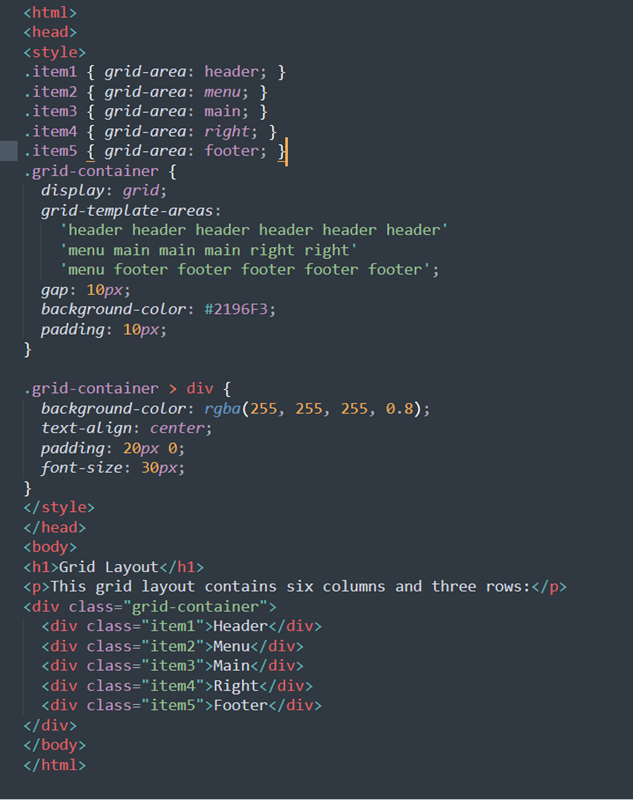
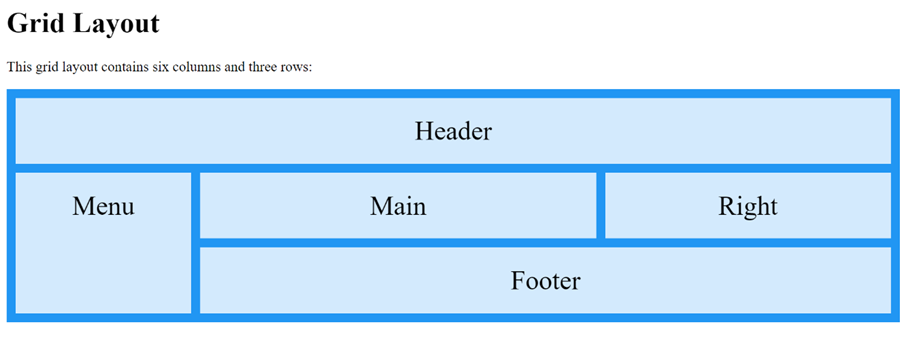
The unit of measure for a quantity can be displayed using the Unit Annotations. The Unit annotations in the metadata are represented as below.
                        <EntityType Name="CustomerType"
                            sap:label="Customers"
                            sap:content-version="1">
                            <Key>
                                <PropertyRef Name="Id" />
                            </Key>

                            <Property Name="Id"
                                Type="Edm.String"
                                Nullable="false"
                                MaxLength="10"
                                sap:visible="true"
                                sap:label="Customer ID"
                                sap:creatable="false"
                                sap:text="Name" />
                            <Property Name="FC"
                                Type="Edm.Byte"
                                sap:label="Field control" />
                            <Property Name="Name"
                                Type="Edm.String"
                                MaxLength="70"
                                sap:field-control="FC"
                                sap:creatable="false"
                                sap:updatable="true"
                                sap:label="Customer Name" />
                            <Property Name="Weight"
                                    Type="Edm.Double"
                                    sap:label="Weight"
                                    sap:unit="Unit" />
                            <Property Name="Unit"
                                  Type="Edm.String"
                                  MaxLength="512"
                                  sap:semantics="unit-of-measure" />
                        </EntityType>
The http Response will look like below
{"d": {
"__count": "3",
"results": [
{
"__metadata": {
"id": "Customer_Odata_Service.CustomerSet/CustomerSet('1000')",
"uri": "Customer_Odata_Service.CustomerSet/CustomerSet('1000')",
"type": "CustomerNamespace.CustomerType"
},
"Id": "1000",
"Name": "Mani",
"FC": 1,
"Weight": "70",
"Unit": "Kg"
},
{
"__metadata": {
"id": "Customer_Odata_Service.CustomerSet/CustomerSet('1001')",
"uri": "Customer_Odata_Service.CustomerSet/CustomerSet('1001')",
"type": "CustomerNamespace.CustomerType"
},
"Id": "1001",
"Name": "Raju",
"FC": 1,
"Weight": "70",
"Unit": "Kg"
},
{
"__metadata": {
"id": "Customer_Odata_Service.CustomerSet/CustomerSet('1002')",
"uri": "Customer_Odata_Service.CustomerSet/CustomerSet('1002')",
"type": "CustomerNamespace.CustomerType"
},
"Id": "1002",
"Name": "Jack",
"FC": 3,
"Weight": "70",
"Unit": "Kg"
}
]
}
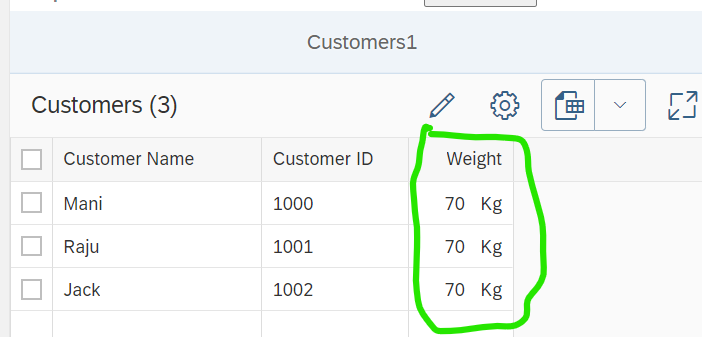
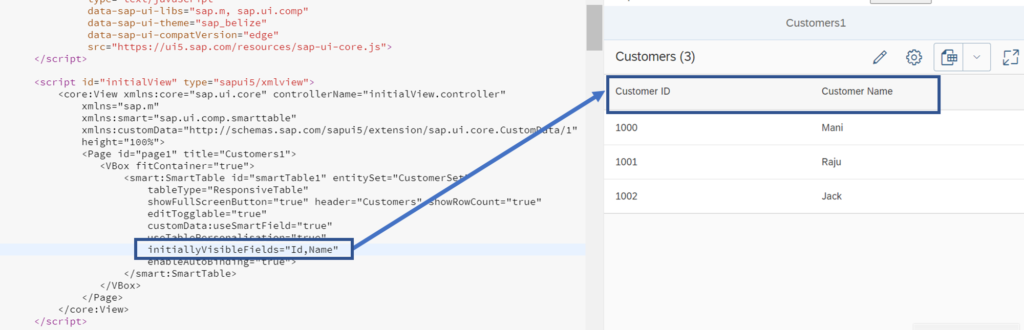
}With the Metadata unit annotations and the corresponding http response will result in rendering a SAP UI5 Smart Table with values (Weight along with the unit) like below