How to use TKINTER UI CONTROLS in Python

Tkinter is a python package that provides various controls, such as buttons, labels, radio buttons, text area and text boxes used in a GUI application. These controls are commonly called widgets.  The Button widget is used to display buttons in your application.

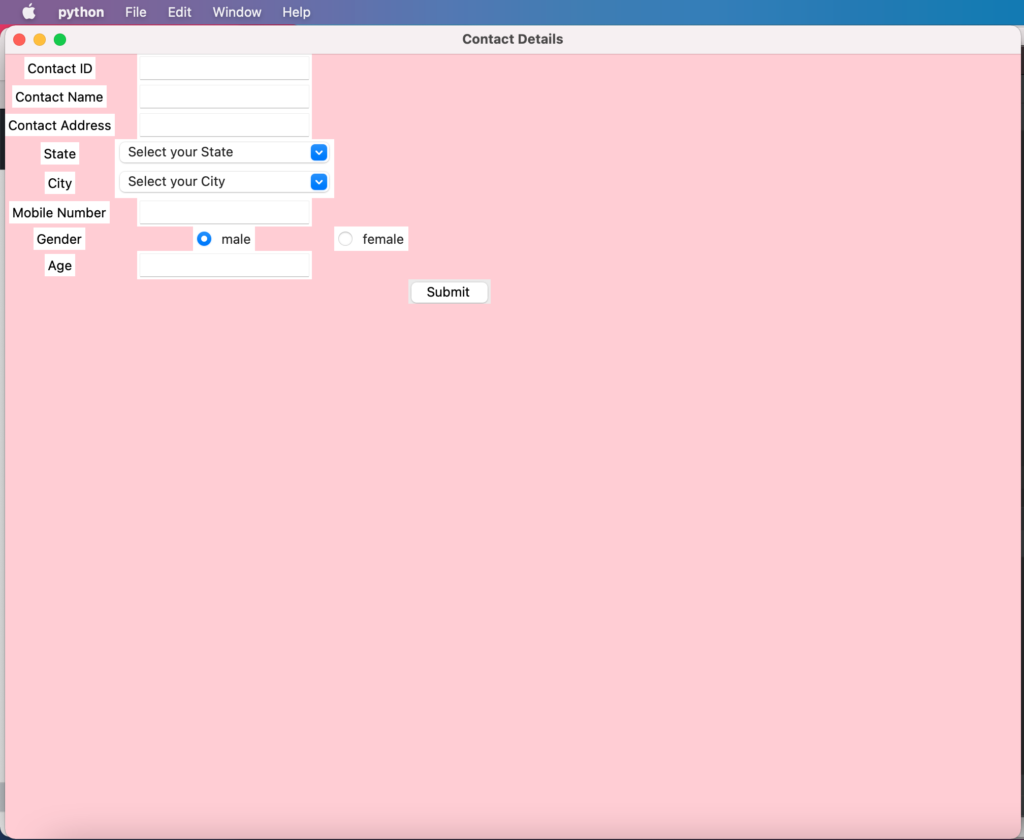
Lets learn these UI controls via a simple form creation program:

from tkinter import *
from tkinter import ttk
from tkinter import messagebox

window = Tk()
window.title("Contact Details")
window.geometry('1000x1000')
window.configure(background = "pink");
a = Label(window ,text = "Contact ID").grid(row = 0,column = 0)
b = Label(window ,text = "Contact Name").grid(row = 2,column = 0)
c = Label(window ,text = "Contact Address").grid(row = 4,column = 0)
d = Label(window ,text = "State").grid(row = 6,column = 0)
e = Label(window ,text = "City").grid(row = 8,column = 0)
f = Label(window ,text = "Mobile Number").grid(row = 10,column = 0)
g = Label(window ,text = "Gender").grid(row = 12,column = 0)
h = Label(window ,text = "Age").grid(row = 14,column = 0)
v=IntVar()
v.set(1)
r1=Radiobutton(window, text="male", variable=v,value=1).grid(row = 12,column = 1)
r2=Radiobutton(window, text="female", variable=v,value=2).grid(row = 12,column = 2)
list_of_state=[ 'Texas' ,'Arizona' , 'Illinois' ,'New Jersey' ,'Utah']
list_of_city=[ 'Houston' ,'Phoenix' ,'Chicago' , 'Atlantic City', 'Blanding']

#the variable 'c' mentioned here holds String Value, by default ""
c=StringVar()
droplist=OptionMenu(window,c, *list_of_state)
droplist.config(width=25)
c.set('Select your State')
droplist.grid(row = 6,column = 1)

#the variable 'c' mentioned here holds String Value, by default ""
c1=StringVar()
droplist1=OptionMenu(window,c1, *list_of_city)
droplist1.config(width=25)
c1.set('Select your City')
droplist1.grid(row = 8,column = 1)

a1 = Entry(window).grid(row = 0,column = 1)
b1 = Entry(window).grid(row = 2,column = 1)
c1 = Entry(window).grid(row = 4,column = 1)
d1 = Entry(window).grid(row = 10,column = 1)
f1 = Entry(window).grid(row = 14,column = 1)
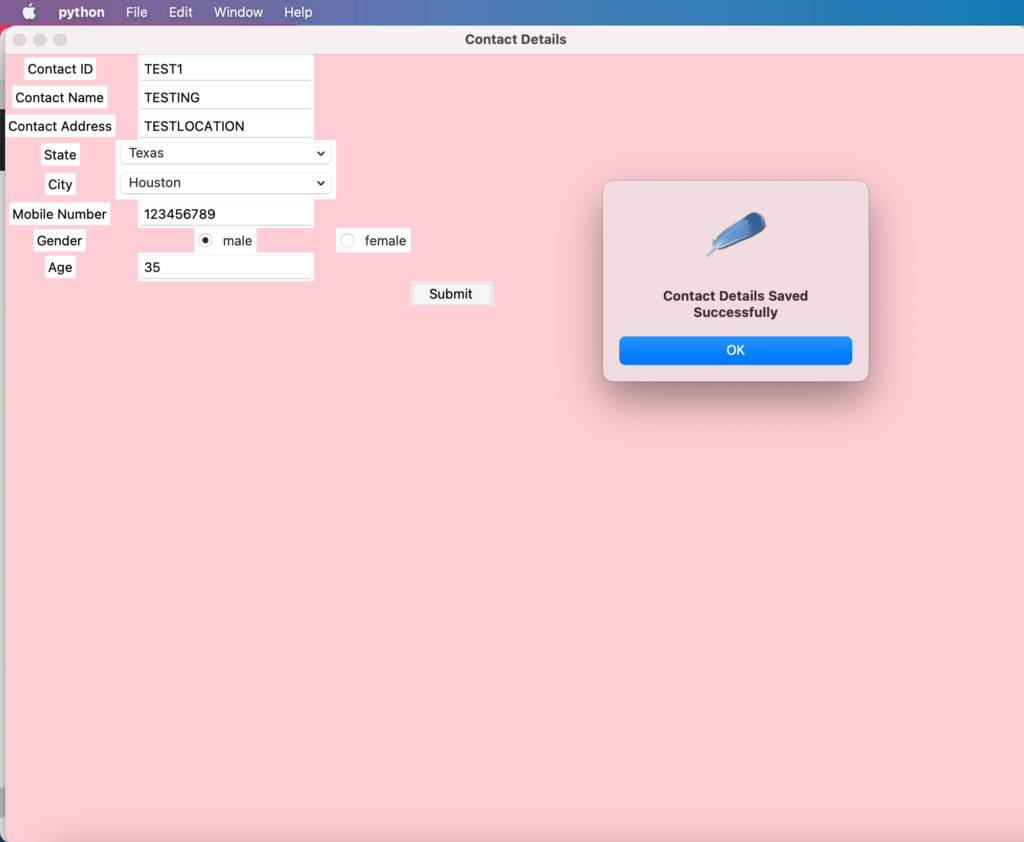
def result():
messagebox.showinfo("information","Contact Details Saved Successfully")
btn = ttk.Button(window ,text="Submit",command=result).grid(row=40,column=3)
window.mainloop()
Run the program and form will get displayed
User should enter the required contact details
Upon submitting the form, user will get the success response message

Modifying the internal table contents using MODIFY statement

Using the MODIFY statement, we can modify more than one data record in an internal table.

It is modified with the contents of the structure along with the additional conditions such as WHERE, INDEX, USING KEY.

Using the ‘TRANSPORTING’ keyword, we can specify which component of the structure in the internal table must be transferred.

WHERE:

DATA lt_internal_table TYPE TABLE OF ztt_db_table2.

DATA ls_record TYPE ztt_db_table2.

SELECT *FROM ztt_db_table2 INTO TABLE lt_internal_table.

ls_record-contact_address = ‘Street 44’.

MODIFY lt_internal_table FROM ls_record TRANSPORTING contact_address WHERE contact_id=102.

INDEX:

MODIFY lt_internal_table FROM ls_contact INDEX 2 TRANSPORTING contact_address.

Using MODIFY inside a loop.

LOOP AT lt_internal_table INTO DATA(ls_record) WHERE contact_id=102.

              ls_record-contact_address = ‘Street 99’.

              MODIFY lt_internal_table FROM ls_record TRANSPORTING contact_address.

ENDLOOP.

How to use Table Expressions to modify internal table

              It is much similar to the READ TABLE technique. The table expressions can be used from ABAP 7.40 SP02 version. Particular data record is assigned to the field symbol. The pointers refers to the respective line of record in the internal table.

DATA lt_internal_table TYPE TABLE OF ztt_db_table2.

FIELD-SYMBOLS <ls_record> TYPE ztt_db_table2.

SELECT *FROM ztt_db_table2 INTO TABLE lt_internal_table.

ASSIGN lt_internal_table[2] TO <ls_record>.

<ls_record>-contact_address = ‘Street 44’.

The Data record at the second position of the internal table is modified.

‘Inline declaration’ can also be used during this modification.

ASSIGN lt_internal_table[2] TO FIELD-SYMBOL(<ls_rec>).

How to Delete records from the internal table in SAP ABAP

The Data records present in the internal table can be deleted in following ways.

  • Key or work area (structure)
  • WHERE conditions.
  • Index
  • From Index TO Index
  • Clean, Refresh, free

DATA lt_internal_table TYPE TABLE OF ztt_db_table2.

DATA ls_structure TYPE ztt_db_table2.

SELECT *FROM ztt_db_Table2 INTO TABLE lt_internal_table.

              ls_structure – contact_id = 102.

              ls_structure – contact_name = ‘Thiru’.

              ls_structure – contact_address = ‘Street 10’.

Key or Work Area:

DELETE TABLE lt_internal_Table FROM ls_structure.

Only for key or structure, ‘TABLE’ is written explicitly after DELETE in the syntax.

WHERE:

DELETE lt_internal_table WHERE contact_id = 102.

INDEX:

DELETE lt_internal_table INDEX 2.

FROM INDEX TO INDEX:

DELETE lt_internal_table FROM 2 TO 3.

If the deletion is successful, then the system field sy-subrc will hold the value 0. If it is not successful, it will hold the value 4.

How to use LOOP AT GROUP BY statement in SAP ABAP

The Group by is used to group a set of records from the internal table. It is similar to the old programming Technik AT ……. ENDAT. If you are new to SAP ABAP, please skip this part as it is an Advanced Technik.

Please remember the following points for the Group by definition.

  • There is always an enclosed loop to read the contents of the group.

As shown in above figure, the group by is defined in the outer loop. Group contents are read in inner loop.

  • It is grouped based on the key components. It is accessed from the assigned field-symbol.
  • Use LOOP AT Group by for the inner loop.

The following code can be used when each line of record in the group must be processed.

LOOP AT lt_contact ASSIGNING FIELD-SYMBOL(<ls_con>) GROUP BY  ( key1 = <ls_con>-contact_id ).

WRITE:/ ‘CONTACT id:’, <ls_con>-contact_id.

         WRITE:/ ‘CONTACT Name:’, <ls_con>-contact_name.

LOOP AT GROUP <ls_con> ASSIGNING FIELD_SYMBOL(<ls_group_data>).

APPEND <ls_group_data> TO lt_group_contact.

         ENDLOOP.

ENDLOOP.

LOOP AT lt_group_contact ASSIGNING FIELD-SYMBOL(<ls_check_group>).

           WRITE:/ <ls_check_group>-contact_id.

ENDLOOP.

Group-Key Binding: –

  • When each line of record in the group need not be processed, then the Group-key binding is considered. It can be used to explain the results of the group. In combination with ‘WITHOUT MEMBERS’, each lines of record does not need to stored additionally.
  • It will have two assignments in the LOOP AT line.
  • The Group size and Group index can be used to extract additional details such as the size of the group, Index of the group.
  • The contents of the group are accessed through the key names defined in the Grouping at the LOOP AT line. It is accessed through the second field-symbol assignment and not through the first field-symbol assignment.
  • LOOP AT Group can only be used, when ‘WITHOUT MEMEBRS’ is not mentioned.

DATA lt_contact TYPE TABLE OF ztt_db_table2.

DATA lt_group_Contact TYPE TABLE OF ztt_db_table2.

SELECT *FROM ztt_db_table2 INTO TABLE lt_contact.

LOOP AT lt_contact ASSIGNING FIELD-SYMBOL(<ls_contact>) GROUP BY

                                                        ( cont_id_key1 = <ls_contact>-contact_id

                                                          cont_name_key2 = <ls_contact>-contact_name

                                                          size_of_group = GROUP SIZE

                                                          index_line_group = GROUP INDEX )

                            WITHOUT MEMBERS

                            ASSIGNING FIELD_SYMBOL(<ls_group>).

              WRITE:/ ‘Contact id:’, <ls_group>-cont_id_key1.

              WRITE:/ ‘Contact Name:’, <ls_group>-cont_name_key2.

              WRITE:/ ‘Size of the group:’, <ls_group>-size_of_group.

              WRITE:/ ‘Index of the group:’, <ls_group>-index_line_group.

END LOOP.

WRITE:/ ‘END’.

The following code is an example without ‘WITHOUT MEMBERS’

DATA lt_contact TYPE TABLE OF ztt_db_table2.

DATA lt_group_Contact TYPE TABLE OF ztt_db_table2.

SELECT *FROM ztt_db_table2 INTO TABLE lt_contact.

LOOP AT lt_contact ASSIGNING FIELD-SYMBOL(<ls_contact>) GROUP BY

                                                        ( cont_id_key1 = <ls_contact>-contact_id

                                                          cont_name_key2 = <ls_contact>-contact_name

                                                          size_of_group = GROUP SIZE

                                                          index_line_group = GROUP INDEX )

                            ASSIGNING FIELD_SYMBOL(<ls_group>).

              WRITE:/ ‘Contact id:’, <ls_group>-cont_id_key1.

              WRITE:/ ‘Contact Name:’, <ls_group>-cont_name_key2.

              WRITE:/ ‘Size of the group:’, <ls_group>-size_of_group.

              WRITE:/ ‘Index of the group:’, <ls_group>-index_line_group.

END LOOP.

WRITE:/ ‘END’.

How to use VALUE# (), REF# (), enclosed Internal tables for Table expressions.

DATA(ls_contact) = VALUE # ( lt_contact[ 1 ] ).

WRITE: / ls_contact-contact_id.

DATA( ls_contact_ref) = REF # ( lt_contact[ 1 ] ).

WRITE:/ ls_Contact_Ref->contact_id.

The difference is clearly evident from the syntax. The former one is a value and the latter one is a reference.

The above table shows clearly that an internal table is enclosed with in another internal table. The record in the enclosed internal table can also be accessed using the table expressions.


Data(lv_mobile_name) = lt_contact[2]–mobile_info[2]-mobile_name

Lt_contact is outer internal table and mobile_info is inner internal table

How to use ‘LOOP AT’ IN SAP ABAP

LOOP AT is used to read more than one data record in an internal table. The Data record is assigned to a local work area or field symbol.

DATA lt_contact TYPE TABLE OF ztt_db_table2.

DATA ls_contact TYPE ztt_db_table2.

SELECT *FROM ztt_db_table2 INTO TABLE lt_contact.

LOOP AT lt_contact INTO ls_contact.

              WRITE:/ ls_contact-contact_id.

ENDLOOP.

The performance of the loop operation is better when it is assigned to a field symbol as the internal table is automatically modified based on the changed Field Symbol value.

FIELD-SYMBOLS: <ls_contact> TYPE ztt_db_table2.

LOOP AT lt_contact ASSIGNING <ls_contact>.

              <ls_contact> – address = ‘Street zz’.

ENDLOOP.

Internal table Data records will be changed for the column address with the value street 22.

The new inline declaration can also be used for LOOP AT like below.

LOOP AT lt_contact INTO DATA(ls_contact).

              WRITE: / ls_contact-contact_name.

ENDLOOP.

LOOP AT lt_contact ASSIGNING FIELD-SYMBOL(<ls_rec>).

              WRITE: / <ls_rec>–contact_name.

ENDLOOP.

The Data records which are processed inside the loop can be filtered using the ‘WHERE’ condition in the LOOP AT line.

LOOP AT lt_contact INTO ls_contact WHERE contact_name = ‘Thiru’.

              WRITE:/ ls_contact – contact_id.

ENDLOOP.

Specific set of records can be picked up for processing using the FROM index TO index options.

LOOP AT lt_contact INTO ls_contact FROM 1 to 2.

              WRITE: / ls_contact-contact_name.

ENDLOOP.

System field variables such as sy-tabix and sy-subrc can also be used in LOOP AT.

LOOP AT lt_contact ASSIGNING FIELD-SYMBOL(<ls_contact>).

              WRITE: / <ls_contact> – contact_name.

              WRITE: / ‘Current index of record’ , sy-tabix.

ENDLOOP.

IF sy_subrc = 0.

              WRITE: / ‘Data records are found inside the loop’.

ENDIF.

If sy_subrc = 4, then there is no data record found inside the internal table.

EXIT, CHECK, CONTINUE : These commands can be used inside LOOP AT.

LOOP AT lt_contact INTO ls_contact.

              EXIT. “Exits the complete loop operation”.

ENDLOOP.

LOOP AT lt_contact INTO ls_contact.

              CHECK ls_contact – contact_id = 102.

              WRITE: / ls_contact–contact_name.

ENDLOOP.

LOOP AT lt_contact INTO ls_contact.

              WRITE: / ‘Don’t execute for contact_id = 101’.

              IF ls_contact–contact_id = 101.

                            CONTINUE.

              ENDIF.

ENDLOOP.

In built Function LINE_EXISTS() in Table Expressions

IF line_exists( lt_contact[ contact_id = 102 ] ).

              WRITE: / ‘Record exists’.

ELSE

              WRITE: / ‘Record does not exists’.

ENDIF

Contact_idContact_NameContact_Address
100MikeStreet 10
101TomStreet 14
102RichardStreet 18

The line exists condition is true as the Data record with contact_id = 102 exists in the Internal table lt_contact.

In the above case, it will not raise any runtime error such as ‘CX_SY_ITAB_LINE_NOT_FOUND’.

How to use Table Expressions in SAP ABAP

Table expressions is similar to Read table query. The syntax for table expressions looks compact. It can read only one data record from an internal table.

The table expressions can be used in the following ways.

  1. Using Index
  2. Using Key
  3. Using Table Key

Using Index: –

DATA lt_contact TYPE TABLE OF ztt_db_table2.

DATA ls_contact TYPE ztt_db_table2.

SELECT *FROM ztt_db_table2 INTO TABLE lt_contact.

ls_contact = lt_contact[1].

The above assignment is done to a work area. It can also be assigned to a Field Symbol like below.

ASSIGN lt_contact[1] TO FIELD_SYMBOL(<ls_contact1>).

It is assigned to the Field_Symbol through inline declaration.

Using Key: –

ASSIGN lt_contact[ contact_id = 102 ] TO FIELD_SYMBOL(<ls_contact1>).

Using Table Key: –

DATA lt_sorted_contact TYPE SORTED TABLE OF ztt_db_table2 WITH UNIQUE KEY contact_id.

DATA ls_sorted_contact TYPE ztt_db_table2.

SELECT *FROM ztt_db_table2 INTO TABLE lt_sorted_contact.

ls_sorted_contact = lt_sorted_contact[ KEY primary_key COMPONENTS contact_id = 101 ].

WRITE: / ls_sorted_contact-contact_name.

Through field symbol.

ASSIGN lt_sorted_contact[ KEY primary_key COMPONENTS contact_id = 101] TO                                          FIELD_SYMBOL(<ls_contact>).

WRITE: / <ls_contact>-contact_name.

What is similar to the Read Table query in SAP ABAP during the assignment to field symbol.

ASSIGN lt_contact[contact_id = 102 ] TO FIELD_SYMBOL(<ls_contact>).

IF sy_subrc = 0

              WRITE: / ‘Data Record is found’.

Else

              WRIITE: / ‘Data Record not found’.

ENDIF.

During assignment of Data record to a field-symbol, if the record exists then it returns sy_subrc = 0. It is similar to the following Read Table query in SAP ABAP.

READ TABLE lt_contact ASSIGNING FIELD_SYMBOL(<ls_contact>).

IF sy_subrc = 0.

              Write: / ‘Data record exists’.

ELSE

              Write: / ‘Data record does not exist’.

ENDIF.

What is difference between Table expressions and Read table during the assignment to a work area.

Table expressions: It result in runtime error with the following exception when the Data record is not found ‘CX_SY_ITAB_LINE_NOT_FOUND’ error.

Read Table: It returns sy_subrc = 8 when the Data record is not found.

TRY.

              ls_contact = lt_contact[contact_id = 106].

              CATCH cx_sy_itab_line_not_found INTO DATA(lx_error).

ENDTRY.

READ TABLE to read data records from internal table in SAP ABAP.

There are three ways to read records from the internal table.

  1. READ TABLE
  2. TABLE EXPRESSIONS
  3. LOOP AT

1.READ TABLE: – It is used to read only one record from the internal table.

2.TABLE EXPRESSIONS: – It is also used to read only one record from the internal table.

3.LOOP AT: – It is used to read more than one records from the internal table.

Contact IDNameAddress
101MikeStreet 10
102TomStreet 12
Database Table : ZTT_DB_TABLE1
  • WITH INDEX: –

Data lt_internal_table TYPE TABLE OF ztt_db_table1

SELECT *FROM ztt_db_table1 INTO TABLE lt_internal_table

READ TABLE lt_internal_table ASSIGNING FIELD_SYMBOL(<ls_record>) INDEX 1

The above READ TABLE statement reads the first record of the internal table.

  • WITH KEY: –

READ TABLE lt_internal_table ASSIGNING FIELD_SYMBOL (<ls_rec>) WITH KEY Contact_ID = 102.

The above READ TABLE statement reads the record with contact id = 102.

  • WITH TABLE KEY: –

If “WITH TABLE KEY” is used, then the internal table must be fully specified. The Definition is specified fully when the key fields are mentioned. If the internal table is not specified fully with keys. Then the Read Table with Table key must be specified fully with all keys. Otherwise it gives the following syntax error ‘The key must be specified in full’.

DATA lt_itab TYPE TABLE OF ztt_db_table2 WITH NON-UNIQUE KEY Contact_id.

SELECT * FROM ztt_db_table2 INTO TABLE lt_itab.

READ TABLE lt_itab ASSIGNING FIELD_SYMBOL(<ls_rec>) WITH TABLE KEY contact_id = 102.

  • TRANSPORTING NO FIELDS: –

Using the Transporting no fields option, we can check the existence of the record. No record is assigned to field symbols or work area.

READ TABLE lt_internal_table TRANSPORTING NO FIELDS WITH KEY contact_id = 102.

If the above record exists, then it returns sy_subrc = 0.